Farine

Crazy for Bread

  • Home
  • About
    • FAQ
  • Recipes
  • Resources
    • BreadCrumbs
    • Other Bread Sites
    • The Grain Gathering
  • Artisans

Noah Elber’s Maple-Oatmeal Bread


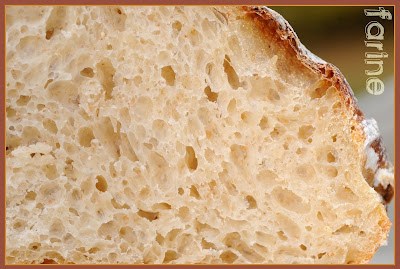
Noah Elbers’s Maple-Oatmeal Bread (as sold at the bakery)

Related post: Meet the Baker: Noah Elbers

Since discovering Noah Elbers‘s Maple-Oatmeal Bread (and before I learned how to make it myself), I have bought maple-oatmeal breads from other bakeries, including in Vermont. I have yet to find one that can compare. I even remember being so put off by one of these other loaves that I cut it into small pieces, took it to the lake and fed it to the ducks (who, having no basis for comparison, seemed to like it way more than we did). It is hard to describe the flavor of Noah’s maple-oatmeal bread other than to say that it is barely sweet, supremely delicate and very, very addictive.


Noah Elbers’s maple-oatmeal bread (as sold at the bakery)

I watched the making of this bread from the mixing of the dough through the shaping but since it was going to be baked much later (after retarding) and we needed to drive back home, I didn’t see the baking. 
Here is Noah’s formula in baker’s percentages:
60% all-purpose flour
20% whole-wheat flour (+ 10% each in starter and in poolish) = 100%
20% cooked steel-cut oatmeal
44% water
2.2% salt
16% pure maple syrup
20% liquid starter
20% poolish (made with a pinch of instant yeast)
All liquids together = 75%
Pointers:
  • Starter and poolish: 12-hour fermentation at 75°F/24°C
  • Oatmeal: Scale equal weight of oats and water. Boil the water, pour it over the oats, stir, cover and bake in the oven at a temperature of about 410°F/210°C for 40 minutes. The oats absorb all the water and by the time they are mixed with the maple syrup, they form an “oat chunk” rather than oatmeal. The water used to cook the oats is not included in the total water percentage
  • Autolyse: 20 to 30 minutes
  • Desired dough temperature: 77 to 78°F/25 to 26°C
  • Bulk fermentation: 2.5 hours with 5 folds after 50 minutes and 5 folds again after 40 minutes
  • No pre-shaping
  • Scaling: at 24 ounces/680 g
  • Shaping: as a boule or as an oval
  • Proofing: 45 minutes on the floor (at least 1 hour at home where the temperature is probably lower) then 14 to 15 hours in the retarder with the cover on
  • Baking: at 400-415°F/204-213°C for 35-40 minutes with lots of steam at the beginning

The first time I made the bread, I miscalculated the amounts (not surprisingly, since I truly am mathematically challenged) and used way too much water. I tried to rescue the dough but to no avail. It spread so much on the parchment paper that I thought I had totally messed up and would for sure get another treat for the ducks. What I got instead was a weird looking but delicious maple-oatmeal ciabatta which we found particularly enjoyable at breakfast. Before we tasted it, I was so mad at having messed up that I didn’t take any pictures but I should have: the bread was rather too dark for a ciabatta and a bit flatter too but the crumb was perfect, delectable and open. I think I will actually make it again…
The second time was at my kids’ house in the Northwest. Having no access to baskets of any kind, I shaped the dough as a boule and proofed it directly on a couche. It rose beautifully in the oven and even though it again turned out darker than I would have liked (the oven was way too hot), the taste was almost spot on.
However since I didn’t want to end up with a ciabatta again and since I had no proofing baskets, I had reduced the amount of water to make sure the dough wouldn’t be too slack. The end result is that I got a tighter crumb than the one I was shooting for.
(By the way, I am sorry for the poor quality of these two pictures. It was very dark out and raining and nowhere in the house could I get enough of the natural light I would have liked to work with.)


Ingredients:
  • 447 g all-purpose unbleached flour
  • 151 g whole-wheat flour
  • 151 g steel-cut oatmeal, cooked as described above
  • 328 g water
  • 151 g liquid starter
  • 151 g poolish
  • 121 g pure maple syrup
  • 16 g salt
Method:
Note 1: The starter has to be fed and the poolish mixed the night before
Note 2: Poolish recipe: 100g flour + 1 pinch of instant yeast + 100g water. Mix well and leave to ferment overnight, preferably at warmish room temperature (above 70°F/21°C if possible)
Note 3: Noah retards this bread for 14 to 15 hours. I didn’t do it (there was no room in the refrigerator) and even though the bread still turned out quite tasty, next time I will retard it and see if the flavor becomes even more complex (it should). Also, since I had no access to a mixer, I mixed the dough by hand.
  1. I mixed all the ingredients except the salt in a big bowl and let the dough rest for 30minutes, covered
  2. I mixed everything again to medium soft consistency, covered the bowl (dough temperature by then was 75°F/24°C ) and applied the 5-folds regimen recommended by Noah (see pointers above). Total bulk fermentation time was three hours at room temperature (72°F/22°C)
  3. I skipped pre-shaping, shaped the whole dough as one single boule and let it proof for two hours covered, on cornmeal-dusted parchment paper (I had no semolina), again at room temperature
  4. I pre-heated the oven at 475°F/246°C half-an-hour prior to baking time, after placing an old metal pan at the bottom and a half-sheet on the middle rack (my kids have no baking stone in their oven)
  5. I slid the boule with the parchment paper underneath on the half-sheet, quickly poured one cup of water in the metal pan and closed the door
  6. I immediately lowered the oven temperature to 450°F/232°C and let the bread bake for 25 minutes without opening the door
  7. I then rotated the bread, lowered the oven temperature to 420°F/216°C and continued the baking for another 20 minutes.
As indicated above and obvious from the picture, I started with an oven which was way too hot and I didn’t lower the temperature enough afterwards. Oh, well, that’s how we learn, isn’t it? Noah bakes this bread at 415-425°F/213-218°C and, according to him, even at that lower temperature it colors quickly, much like it would in a hotter oven, maybe because of all the steam coming off the baking loaves or the materials his oven is made of or the heat or a combination of all these factors. Basically the home baker will have to find the temperature that works the best in his/her oven for this bread. But even if it comes out a bit too dark for your taste at first, I bet you will love it!

Noah Elber’s Maple-Oatmeal Bread goes to Susan’s Wild Yeast Blog for this week’s issue of Yeastspotting.

Share this:

  • Facebook
  • Pinterest
  • Twitter
  • Email
  • Print

January 5, 2011 · Filed Under: Breads, Breads made with starter, Recipes, Videos, Yeasted breads · 18 Comments

Meet Solange Couve, Artisan Jam-Maker

Related post: Pear-Chestnut Confit
I don’t often write about non-bread magic but I must share with you this visit to Solange Couve, jam-maker extraordinaire who lives with her husband Stéphane (whom we didn’t get to meet as he was away visiting his mother), her dog Victor and her two cats, Lulu and Lily, in a remote corner of the Ardèche department in south-central France. From the highway it takes about 45 minutes and hundreds of steep curves on very narrow roads (we were glad to be traveling on a holiday when traffic was sparse) to reach the farm.
New vistas opened up with each turn in the road and if it had been possible to stop more often (alas, opportunities to just get off the road and admire the landscape were few and far between), I could have taken dozens of pictures, all different. It’s easy to understand why so many of my French friends rave about vacationing in the Ardèche backcountry.
Like Emerald City in the Wizard of Oz, the farm is literally located at the end of the road.
The farmhouse has remained pretty much as it was when Solange and her husband decided to make it their permanent home 27 years ago. The sink has remained the same, the doors and walls were repainted in their original colors and the volumes were not altered.
Solange and Stéphane happened upon the farm one day while traveling in the area and fell in love with it at first sight. It then belonged to two elderly sisters who, as it turned out, were only too glad to sell and move away. The surrounding land had been left idle for 20 years although some of it was being farmed by neighbors. The couple led a busy life in Paris where Stéphane was a dentist with a thriving practice and Solange, who was a real estate agent, spent her week commuting from the capital to central France and to Corsica. In other words, they mostly saw their new house as a destination point for downtime.
After a few years however the pull of the farm became too strong to resist. Stéphane sold his practice and bought a new one in the Rhone valley, about 45 minutes away. As for Solange, she decided to forego real estate and to become a farmer. Now for that dream to become reality, two things needed to happen: the land had to be cleared up (a process which involved an enormous amount of manual labor) and Solange needed to acquire notions of agriculture. Not a woman to be easily deterred, she enrolled in an agricultural studies program in Valence and spent a year learning everything there was to know about trees: how to plant and prune them, how to take care of them, etc. When that was done, she spent another year learning about food-processing to find out all she could about sugar chemistry. An overkill, she soon realized, for someone whose only aspiration was to learn how to make jam properly. But Solange is nothing if not thorough and she forged ahead.
Meanwhile the land had been cleared and planted with close to 4 acres of fruit-trees. Since the Ardèche is raspberry-heaven, Solange also planted 2.5 acres of raspberry bushes as well as red and black currant bushes. For the first 10 years, she produced on average 6 tons of raspberries a year and sold them fresh to the local cooperative. Then the raspberry bushes were hit by some illness and had to be ripped out. She decided to diversify.
Using no other ingredients than fruit (pears, apricots, peaches, quinces, berries, etc.) from her land and sugar, she started producing more than 5 tons of jam a year which she sold mostly to luxury hotels and restaurants and to high-end grocery stores and bakeries as well as to fruit and vegetable markets which offer a small artisanal product section.
Since she had kept the chestnut-trees (the Ardèche is famous for its chestnuts) which were on the property when they bought it, she embarked on a trial-and-error learning process which taught her how to turn her chestnuts into delicious marrons glacés (candied chestnuts), crème de marrons (chestnut spread) and purée de marrons (chestnut purée). She also learned how to make pear-chestnut confit, an exquisite concoction which can be served with a brioche as a light dessert at the end of a holiday meal or poured over fromage blanc (soft curd cheese). As soon as she mentioned it over the phone, I knew I wanted to learn how to make it and report on it on the blog (after all, it could tempt you to make a brioche to go with it!).
Today Solange is semi-retired. She has kept her workshop (located about 2 miles away from the farm) but she only works for a few luxury hotels and restaurants on the Côte d’Azur and in the Alps as well as for family and friends. She still makes marrons glacés and other chestnut delicacies, including the confit, but she no longer sells them (too much work). I wish I could describe in details the lunch and dinner ardéchois she prepared for us and the extraordinary breakfast that awaited us in the morning featuring grape juice from her own grapes, no less (they grow on the vine that shades the big table just outside the kitchen door), but it would be off subject. Suffice it to say that Solange loves to cook and that her imagination is bottomless when it comes to extracting as much flavor as possible from the fruit and vegetables she grows on her land. We were awed!

Share this:

  • Facebook
  • Pinterest
  • Twitter
  • Email
  • Print

December 12, 2010 · Filed Under: Artisans · 7 Comments

Pear-Chestnut Confit

Related story: Meet Solange Couve, Artisan Jam-Maker

Chestnuts are abundant in the Ardèche where they are used in a variety of dishes, some sweet and some savory, and even in bread. To make this confit, Solange uses chestnuts from her own chestnut-trees.
She also uses pears from her orchard (she only grows Williams pears). The ones she uses in this particular dish are the last of the season and she has saved them for the demo. 2010 hasn’t been a great year for pears: last year the pear-trees yielded a huge crop of very big pears but this year, they struggled to produce fewer and much smaller fruit. Still the pears seem marvelously fragrant and juicy to me.
For this recipe, the pears are first peeled…
… then cooked in syrup until they become translucent.

As for the chestnuts, they are cut horizontally in a circle, then boiled briefly to slightly loosen their two layers of skin. Once peeled, they are cooked in boiling water before being added to the pears. Preserved chestnuts in syrup can also be used, whether home-made or store-bought.

Solange uses a special knife to cut through the chestnuts but as demonstrated in the video below, a regular paring knife can also be used.Previously, when she was processing her chestnuts for commercial purposes, she had them peeled in the village by an artisan who uses a less labor-intensive technique: he places the chestnuts inside a rotating cylinder perforated with many small holes and uses a flame-thrower. The flames lick the outside of the cylinder, burning away most of the skins. The chestnuts are next dipped in water then placed on a rolling mat where the remaining skins are removed by hand. The perfect ones can be used whenever a recipe calls for whole chestnuts whereas the other ones are puréed and used in other recipes.
Solange says that it is best to let fresh chestnuts dry out a little as they are easier to peel if they have shrunk a little. Store-bought ones are usually somewhat dry already, so this step can be skipped. Since the skins are easier to remove when the chestnuts are hot, it is almost guaranteed to be a challenging exercise and caution is de rigueur. If one isn’t really partial to burned fingers, it is best to use chestnuts preserved in syrup as a less hazardous alternative.
Ingredients:
1 liter of water
400 g crystallized sugar
10 pears
10 big fat chestnuts (or their equivalent in broken pieces)
1 vanilla bean (from Tahiti if available)
Method:
  1. Peel and cook the chestnuts as described above. Solange cautions that the chestnuts need to be peeled while still hot as their skin starts to stick again when they cool down.
  2. Heat water in a medium-size wide and shallow pot (to facilitate evaporation) and add the sugar
  3. Slice open the vanilla bean and scrape the tiny grains into the syrup, then add the two halves of the vanilla bean to the pan
  4. While the syrup is boiling, peel and core the pears and cut them in quarters
  5. Plunge them delicately into the boiling syrup and let them simmer. Refrain from handling them as they cook. To avoid breaking them, do not flip them over
  6. When the pears are translucent, gently add the chestnuts with some of their cooking water and let the syrup thicken again
  7. Pour into jars when done. The confit will keep for a couple of weeks in the fridge. To extend its shelf life, it is imperative to sterilize the jars, a precaution that Solange takes systematically. She places all her jars in a big pot, covers them with cold water, then bring the water to a boil and lets the whole thing boil at 176°F/89°C for 15 minutes. None of her jars has ever spoiled.
Unfortunately my version of iMovie doesn’t allow me to add subtitles or I would have done so. But I can at least tell you what Solange is saying in this video clip (and please excuse my use of the French word “translucide” for “translucent” in the spoken dialogue. After two weeks of complete French immersion, I clearly had a hard time switching my aging neurones to English!).
  • When adding the pears to the syrup, make sure they are completely immersed and let them simmer
  • When preparing the chestnuts for peeling, cut through both skins all around. It is a bit hard to do but but when cut that way, both skins loosen simultaneously in boiling water.
  • Using a chestnut knife makes cutting the chestnuts in a circle a bit easier but a regular paring knife can be used as well
  • It doesn’t matter if the cut penetrates the flesh of the chestnut
  • After peeling, the chestnuts need to be cooked before they can be added to the pears
  • Add some of the chestnut cooking water to the syrup in the pear pan, so that it can thicken again without caramelizing
  • It doesn’t matter if the chestnuts crumble when added to the pears. In fact if using preserved chestnuts you probably want to break them a bit at this point.

Share this:

  • Facebook
  • Pinterest
  • Twitter
  • Email
  • Print

December 12, 2010 · Filed Under: Desserts & Sweets, Recipes · 3 Comments

The last two months…

…have been pretty hectic and haven’t offered me much time to bake, let alone blog about it. A week before Halloween, we embarked on a close-to-4-week-long post-retirement jaunt which took us from Amsterdam to Paris via a circuitous route (we hit Geneva, Cannes, Marseille and the Ardèche on the way) and allowed us to visit with family and friends as we never could when we were both working. We started with my in-laws and worked our way down and back up, meeting new friends, discovering along the way cousins whom we didn’t even know we had a few months back and tightening up lifelong ties with former neighbors as well as with childhood schoolmates. What a unique and joyful experience!
When we finally flew back a week before Thanksgiving, we didn’t go home but straight to the Pacific Northwest where we’ll be relocating early next year and where we spent the last three weeks trying to put together a budget and a timeline for renovating the house we just bought. We are staying with one of our sons and his family and even though my friends at Tree-Top Baking kindly brought me some of their levain and my daughter-in-law couldn’t be more gracious about sharing her kitchen and her oven, the truth of the matter is that it isn’t really possible to make artisan bread regularly when you are out and about all the time.
All this goes to explain why this blog has been mute since early October. I’ll do my best to catch up but more upheavals are in the works: while we are flying back East tomorrow, we’ll be hitting the road next week (weather-permitting) to go and spend the holidays in the Midwest with yet another one of our kids and his family. So bread-baking opportunities will alas remain few and far-between for the foreseeable future.
In October though, before we left the US, I met with a most interesting and talented young baker whom I’ll be blogging about as soon as I can put the story together and in France, I spent 24 hours with a jam-maker extraordinaire who, using the pear and chestnuts from her farm, showed me how to make a delicate “confit’ that would be a delicious addition to any holiday table, especially in the company of a buttery brioche. So please stay tuned!

Share this:

  • Facebook
  • Pinterest
  • Twitter
  • Email
  • Print

December 7, 2010 · Filed Under: Misc. writing · 1 Comment

Tartine’s Basic Country Bread (baked two ways)


Baking started in a cold oven

Baking started in a hot oven

We’ll be moving to the Pacific Northwest next year, probably sometime in the spring. Considering how costly such a move is bound to be, we have started divesting ourselves of whatever we can bear to part with. Almost first to go, I am sorry to say, have been stacks and stacks of books, some of which had traveled with us from Europe thirty years ago. But it would probably cost more to ship them that to buy them again (although some of them are no longer in print and cannot be replaced)…

Our local library was accepting book donations last Sunday and you should have seen the elderly volunteer’s eyes light up when we pulled over with our carload. He hurried away to get a cart and couldn’t stack the boxes on it fast enough. I guess he didn’t want to give us a chance to change our minds. I felt a twinge of sadness abandoning these old companions but the Man said: “It’s okay. There’ll be new books…” and I felt some degree of comfort in that thought. Plus I like the idea of our books being adopted by book lovers.

I know there are new books in our future and I do look forward to discovering them. Most of them will probably be stored on our Kindles however as we won’t have as much shelf space in our new home and many will actually be old since the Web offers a huge selection of books that have passed out of copyright, books I might never have access to otherwise and that I enjoy tremendously.

But have you tried reading a cookbook on a Kindle, or rather cooking from one? I have and I found it challenging to say the least. So just as I drew the line at giving away any of my cookbooks (I did last time we moved and ended buying some of them again), I still find myself buying bread-books when they catch my attention with their siren-song, which is what happened with Chad Robertson’s Tartine Bread. Once I had it in my hands, Chad’s conversational tone and the pull of Eric Wolfinger’s photographs were too much for me and I bought it even though it will now have to be schlepped cross-country! I just couldn’t resist the urge to read it (our library doesn’t carry it yet).
Chad advises the home baker to bake Tartine’s basic country bread in a dutch oven combo such as this one in order to gain “the two main characteristics of a professional brick oven: a sealed moist chamber and strong radiant heat”.
Now I have been baking round loaves in my dutch oven for years and truly love the way the bread comes out. But I was intrigued by the fact that Chad recommends pre-heating both the oven and the dutch oven so that the dough can be turned out into a hot pot. I have had excellent results with cold bakes (setting the dough in a cold dutch oven and putting said dutch oven in a cold oven). I find it much less dangerous to my health to handle a cold cast iron pot than to grapple with a hot one (I confess I am pretty clumsy and I have the scars to prove it).
So I decided to experiment. I made a batch of Chad’s basic country dough and I baked one loaf cold and the other one hot. The results are a little bit skewed by the fact that I forgot to put the second loaf in the fridge while the first one was cooking, so that it ended up proofing about one hour longer. The kitchen was cool (65 ° F) however, so it may not have made much of a difference but still, the experiment would have been more meaningful if I could have baked both loaves at the same time in two different ovens, one pre-heated with a dutch oven inside and one stone-cold. Alas, I have but one oven…
As it is, I did get different results: cold-baking gave a higher loaf (3.25 inches vs. 3 inches with hot-baking) and a slightly more open crumb. Of course when you mix enough dough for two loaves, unless you have access to two ovens and two dutch ovens, you will always be in a situation where you’ll have to do at least one hot bake. 😉 But why not bake the first one cold? In my experience the dough loves this very slow rise in temperature in a highly humid environment (because of the water present in the dough, there is a lot of steam inside the dutch oven).
Ingredients (for 2 loaves)

  • 700 g + 50 g water @ 80°F/27°C
  • 200 g mature levain (100% hydration) (fed with 50% all-purpose unbleached flour and 50% La Milanaise‘s sifted flour which is high-extraction and contains some bran. Regular whole-wheat can be substituted maybe with a pinch of dark rye for flavor)
  • 900 g all-purpose unbleached flour
  • 100 g whole-wheat flour (I used freshly milled)
  • 22 g salt (Chad uses 20 g but I adjusted for the flour in the levain)
Method

Note that you can choose to make this dough over two days as a matter of convenience or to get a different flavor if you set the loaves to rise in the fridge overnight or for up to 12 hours.

The dough is hand-mixed in a large bowl but mixing time is kept to a minimum. I won’t go into great details as the process is pretty straight-forward but here is what I did.
  1. As recommended by Chad, I started by mixing the levain with 700 g of water (reserving the extra 50 g), then I added the flours and mixed until all the flour was thoroughly hydrated
  2. I let the mixture rest for 40 minutes (autolyse)
  3. Then I added the salt and the reserved water and I did as many folds as necessary (still in the bowl) until the dough was cohesive and reasonably smooth
  4. I transfered it to a lidded plastic container and set it to ferment at 80°F/27°C, using the proofing box the Man put together for me a couple of years ago on the model of this one
  5. I gave it three folds (inside the container) at roughly one-hour intervals and stopped the fermentation after 4 hours
  6. I divided the dough in half, pre-shaped each half in a round, let them relax 10 minutes and shaped them as boules which I set to proof in baskets
  7. Proofing (in a large clear plastic bag) lasted 2 hours and fifty minutes (at room temp but under the kitchen lamp which does provide some heat)
  8. I dusted the top of one loaf with semolina flour and covered it with a sheet of parchment paper. I quickly inverted the basket over the paper and using the sheet of paper as a sling, transferred the boule to my cold dutch oven
  9. I dusted the loaf with flour and scored it in an x pattern, set the lid on the dutch oven and put the whole thing in the cold oven
  10. I set the oven temperature to 470°F/243°C and pressed the start button
  11. I let the loaf bake covered for 45 minutes, then I took it out of the dutch oven (using heavy oven mitts) and, removing the parchment paper, set it directly on the heated baking stone (this stone is a permanent fixture in my oven) and let it bake another 20 minutes at 455°F/235°C, then I took it out of the oven and set it to cool on a rack where it promptly started making wonderful crackling music
  12. Following Chad’s instructions, I then pre-heated the oven to 500°F/260°C after putting the by-now barely warm dutch oven inside with the lid on
  13. I then transferred the second loaf to a piece of parchment paper after dusting the top (which quickly became the bottom) with semolina flour and with some trepidation (and heavy oven mitts) removed the now boiling-hot dutch oven from the oven. Again using the paper as a sling I set the loaf inside the pot, dusted it with flour, scored it in a square pattern, closed the lid and set the whole contraption back in the oven
  14. I immediately reduced the oven temperature to 450°F/232°C and let the loaf bake, covered, for 20 minutes. I then removed the lid and let it finish baking in the open dutch oven for 25 minutes. I set it to cool next to the other loaf and it too started to make music pretty soon.
Note that immeditately after, both loaves were registering an internal temperature of 215°F/102°C which indicated that they were fully baked.
Baking started in a cold oven
Baking started in a hot oven
We haven’t sliced open the second loaf (which is intended for our daughter’s family) but I doubt there will be much of a difference between the two, taste-wise. I do like the taste and texture of Tartine’s basic country bread but bread is like love (and as the old French saying goes, love is like Spanish inns: in the old days at least you only found in them what you brought to them. My apologies to Farine‘s Spanish readers. I have no clue as to whether or not French inns were truly any better than Spanish ones in those days and I certainly don’t mean to be insulting. What I do mean to say is that the better the ingredients, the better the bread.
I love the taste of the levain when it isn’t entirely white and failing access to La Milanaise‘s sifted flour you may want to use a bit of rye to give your starter a more interesting flavor. Likewise, for whole wheat flour, I use red hard winter wheat I bought last summer in Vermont from Jack Lazor at Butterworks Farms and I mill it just before mixing. I love its fragrance and its taste. Not everybody has the time or the desire to mill grain before baking but what is true of the grain is true of the flours: some are more flavorful than others. It is a good idea to shop around and try different ones to determine which one brings out the best flavors in your bread. I know for a fact that my bread became much better when I started looking for tastier alternatives to supermarket flours (I still use big brand flours for all-purpose though). So hats off to Chad and his basic country loaf: it does showcase the flavor of the grain and it is pretty easy to make (provided one exercises caution when handling the hot dutch oven). But do start the first loaf in a cold oven. It saves energy and it yields excellent results.
Tartine’s basic country bread goes to Susan from Wild Yeast for this week’s Yeastspotting.

Share this:

  • Facebook
  • Pinterest
  • Twitter
  • Email
  • Print

October 20, 2010 · Filed Under: Breads, Breads made with starter, Recipes · 13 Comments

  • « Previous Page
  • 1
  • …
  • 48
  • 49
  • 50
  • 51
  • 52
  • …
  • 76
  • Next Page »

Hello!

MC-Profile- 2013 - DSC_0934

My name is MC: formerly a translator,  now a serious home baker and a blogger. If you like real bread and love to meet other bakers, you are in the right place. Come on in...

Learn more →

  • Email
  • Facebook
  • Instagram
  • Pinterest
  • RSS
  • Twitter

Don’t want to miss a post?

Subscribe to Farine via email

Archives

Categories

Copyright © 2025 Farine · Design by Design Chicky Log in