Farine

Crazy for Bread

  • Home
  • About
    • FAQ
  • Recipes
  • Resources
    • BreadCrumbs
    • Other Bread Sites
    • The Grain Gathering
  • Artisans
You are here: Home / blog

White Whole Wheat Laurel Wreath


Pour la version française de cette recette, cliquer ici
Ladies and gentlemen, let me introduce you to a most festive bread! Certainly the most “wow” one I’ve ever made with so little effort.
The original recipe comes from Beatrice Ojakangas’ Great Whole Grain Breads. I tweaked it some by replacing the quarter cup of lard or shortening (which I don’t like to use for health reasons) by applesauce and almond oil (I love the taste of apples with molasses and spices, and I like the softness that the oil brings to the dough). I also used dried cranberries instead of raisins (for the added touch of color) and white whole wheat flour instead of regular whole wheat flour (( don’t think white wheat existed at the time the book came out back in the 80’s).
I am still amazed by how docile this dough is, how easily it lets itself be rolled into 36-inch cylinders, how obediently it braids without breaking, how cheerfully it rises and presents its ruddy cheeks to be chiseled into leaves.
I have made it twice so far and twice I have been thoroughly charmed by the sheer pleasure of working it.
The first time I followed Ojakongas’ instruction to brush the top of the leaves and the rims of the wreath with molasses as soon as it came out of the oven. It made it glossy and yummy but on camera, it gave it a burned look (see the picture at the very end of the post) and also it tended to stick to everything (which is a bit annoying if you are going to take that wreath somewhere and need to wrap it).
So the second time, I just lightly floured the wreath before cutting out the leaves and lookswise, I like that version better. Tastewise, it’s slightly less flavorful but on the whole, pretty much a toss.
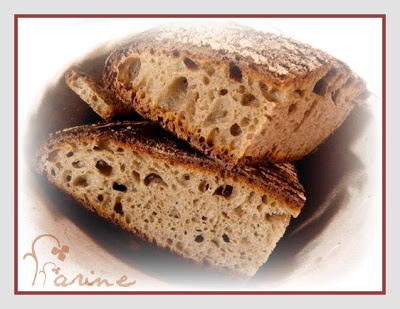
The loaf is 55% whole wheat. 

Ingredients:
For the soaker

  • 479 g boiling water
  • 100 g dark molasses (not blackstrap)
  • 28 g bran
  • 53 g wheat germ
  • 53 g rolled oats (quick or old-fashioned)

For the dough

  • 333 g white whole wheat flour
  • 270 g unbleached all-purpose flour
  • 70 g gluten
  • 40 g unsweetened applesauce
  • 16 g almond oil (or neutral oil such as canola)
  • 66 g dried cranberies
  • 10 g yeast
  • 10 g salt
  • 1/2 tsp ground ginger
  • 1 tsp ground cinnamon
  • 1 tsp ground nutmeg

Method:
For the soaker

  1. Put all of the soaker ingredients in a heat-resistant bowl
  2. Pour the boiling water over them and let soak for 1 to 2 hours (or at least until thoroughly cooled) 

For the final dough (I used my bread machine but you can knead by hand or use a stand mixer. In my machine, the wet ingredients go first. In some machines, the dry ones do. So please check your manual for instructions)

  1. Put all of the soaker in the tub of the bread machine
  2. Add the oil and the applesauce
  3. Add the flours, the gluten, the yeast and the salt
  4. Start the dough program
  5. When the beep sounds, add the spices and the cranberries. Check to make sure the cranberries are well distributed in the dough. If that’s not the case, take the dough out, knead it by hand for a few minutes and put it back in the machine
  6. Let the machine run to the end of the dough cycle
  7. When the cycle has ended, take the dough out of the machine
  8. Put it on a (very lightly) floured counter and give it as much of a rectangular shape as you can, to make it easier to eyeball it when you next divide it into 3 equal pieces. My dough weighed exactly 1.5 kg, so I knew I had to get 3 x 500 g
  9. Flatten each of these pieces slightly and shape it into a rough cylinder
  10. Let rest on the counter under a plastic wrap for about 20 minutes
  11. Shape each cylinder as you would a baguette (for a baguette shaping photo tutorial, click here) but keep on rolling until you get a 36-inch long rope (it’s best to do it in stages, in other words, to roll out the first one to about 20 inches, then put it back under the plastic sheet and roll the next one, etc. By the time you come back to the first one, it will have slackened some and it’ll be easier to get it to the desired length)
  12. When you have your three ropes, braid them into a thick plait, then join the ends to make a wreath
  13. Set on a half-sheet pan covered with parchment paper dusted with semolina
  14. Put inside a large clear plastic bag to rise. Blow once in the bag before closing it tightly
  15. Let rise at room temperature about 40 minutes or until noticeably bigger
  16. Half-way through the rising time, turn on the oven to 375F/191C after placing in it a baking stone and an empty metal pan
  17. When the dough is ready, dust with flour and use scissors to cut a 2-inch “leaf” by snipping horizontally in each section of the braid; continue to snip leaves all around the wreath; the leaves will lift themselves up as the bread bakes
  18. Pour 1 cup of water in the hot metal pan, slip the bread into the oven, spray a couple of times and close the door
  19. After 20 minutes, lower the oven temperature to 350 F/177 C and continue baking for 20 more minutes
  20. Take out of the oven and let cool on a rack. Enjoy!
  21. The wreath below goes to my friend Joanne – whose birthday we celebrated the other day – for being unfailingly present in all of life’s joys and sorrows, for always looking for and finding the bright side of everything and for being such a loving and attentive person.
    Here’s to you, Joanne! You won’t be able to wear it (it’s a little sticky because of the molasses) but you’ll get to eat it. Happy Birthday!

    Update: I am contributing the White Whole Wheat Laurel Wreath to the 2011 Holiday issue of Yeastspotting.
    Happy Holidays everyone!

Share this:

  • Facebook
  • Pinterest
  • Twitter
  • Email
  • Print

May 28, 2009 · Filed Under: Breads, Recipes, Yeasted breads · 12 Comments

A Peter Reinhart Talk on Bread

Click here if you’d like to watch a 15-minute Peter Reinhart video on the art of baking bread.
I find it moving to see that after a lifetime of baking, Reinhart’s awe at what goes on in bread-making, from life (wheat) to death (harvest) to life again (dough) to death again (in the oven) to life again (in our bodies) is still very much, well, alive!

Share this:

  • Facebook
  • Pinterest
  • Twitter
  • Email
  • Print

May 28, 2009 · Filed Under: BreadCrumbs · Leave a Comment

100% Whole Wheat Mash Bread – Updated post (see bottom)

Please don’t think that I am already responding to the challenge I set for myself here yesterday, i.e. that I already read the introduction to Reinhart’s Whole Grain Breads (all 75 pages of them) and learned to master the master formula. I haven’t moved one iota in that direction yet.
No, this mash bread is the product of two preferments which were already alive in my kitchen as I was writing that other post, both whole wheat: a mash and a levain. I had made both before I even thought of challenging myself. Actually I challenged myself because I made them both.
See, I must be a rebel at heart (at least that’s what the headmistress – who was a nun – told my Dad when she made him come and pick me up from school right in the middle of a workday because I had kicked her in the shin. Of course she didn’t tell him that she had slapped me first and when my Dad heard that, he said he understood and had often felt like kicking her himself but to please not do it again. I was 9 when it happened and to this day, I have never kicked a nun again, so I can’t be that much of a rebel).
Anyway to come back to these preferments, I was a bit stressed out by Reinhart’s instructions about sticking the mash in and out of the oven to keep it at the right temperature and I just didn’t feel like doing it.
Then I remembered that Baggett’s mash making method in Kneadlessly Simple was actually just that… quite simple: it involved pouring boiling water over the whole wheat flour just as Reinhart says to but after that, just to put the bowl in the microwave next to a cup of hot water, to wait 15 minutes and microwave on High for 1 minute, then wait 30 minutes and do it again, and then that was it. You could let the mash do what it had to do without having to worry about it.
But I was mixing her method and his method and even though it was simpler, it was also very confusing and that’s when I decided that enough was enough, I had to read the book and understand the whys and why nots of Reinhart’s technique and take it from there.
However I had my two preferments and they both looked fine. I put them in the fridge overnight so that they wouldn’t get carried away while I was sleeping and two hours after I took them out this morning, they were at room temperature and ready to go to work.
So I took out the book, opened it to page 199 without even glancing at the introduction and set out to read the recipe/formula.
I was astounded right off the bat because, get this, there was NO mention of water. Mash, levain, whole wheat flour, instant yeast, salt and oil or butter (honey or agave nectar or sugar too but it’s optional and I optioned it out) and NO water, which meant that, either the mash and the levain were watery enough for the amount of flour indicated or Reinhart had had a senior moment and completely forgotten about hydration or he had invented a new breadmaking technique that didn’t require any water and I didn’t know about it since I hadn’t read the introduction.
Well, now was not the time to find out. I decided to wing it. Just to be on the safe side, I put a cup of water on standby next to the mixer and proceeded as instructed.
But the dough didn’t need more water. It actually needed more flour! And Reinhart says that, yes, sometimes you have to add water and sometimes you have to add flour, and it’s okay! So I added away. Altogether I added 94 g of whole wheat flour to the 255 g already in the formula.

That’s a lot! But that’s the only way I could think of to eventually get a mash bread and not dozens and dozens of mash silver pancakes because that dough looked like a batter for the longest time, I kid you not. All of a sudden however it decided to stop joking around and settled down to business and it became beautifully soft, smooth and elastic.
It actually became so pleasant to work with that I got second thoughts about reading the book. Don’t they say that too much knowledge can be dangerous?

Ingredients:
For the mash

  • 300 g water 
  • 120 g whole wheat flour 
  • 1 g diastatic malt powder 

For the levain

  • 64 g mature whole wheat starter
  • 191 g whole wheat flour
  • 142 g water at room temperature 

For the final dough

  • 398 g starter (i.e. all of it)
  • 397 g mash (i.e. all of it)
  • 255 g whole wheat flour + 94 g (see above)
  • 8.5 g salt
  • 7 g instant yeast
  • 14 g almond oil (you can also use melted butter or vegetable oil and it is optional but I chose to put it in because it helps the bread stay fresh longer) 
  • extra whole wheat flour for adjustments 

Method:
Please note that I am describing what I did, not necessarily what Reinhart says to do. Also note that I used a stand mixer but that the dough can be kneaded by hand.

For the mash

  1. Set water to boil
  2. When it boils, pour it over the flour and the malt. Mix briefly and set in the microwave oven next to a cup of hot water
  3. Fifteen minutes later, microwave on High for one minute without opening the microvave oven. Repeat after 30 minutes and leave to cool in the microwave
  4. When cool and after 3 hours at room temperature, you can either refrigerate it until you are ready to use it or leave it out overnight if you plan to use it within the next 24 hours. (I left it out for about 12 hours, then I put it in the fridge)

For the levain

  1. Mix all the ingredients together in a bowl to form a ball of dough. Using wet hands, knead in the bowl for about 2 minutes until the ingredients are evenly distributed and the flour is hydrated. Let rest 5 minutes and knead again with wet hands for one minute. The dough will be tacky
  2. Transfer to a clean bowl, cover losely with plastic wrap and leave at room temperature for 4 to 6 hours until nearly doubled in size (Reinhart warns it can take 8 hours or longer)
  3. When the levain is fully developed, knead it for a few seconds to degas it. It is then ready for use but if necessary to coordinate the timing with the mash, cover tightly with plastic wrap and refrigerate overnight. Remove from the fridge two hours before mixing the dough (in my case, it stayed out pretty much the whole day then went in the fridge together with the mash)

For the final dough

  1. Using a metal pastry scraper, chop the starter into 12 smaller pieces
  2. Put the pieces and all the other ingredients except the extra flour into the mixer with the paddle attachment and mix on slow speed for 1 minute
  3. Switch to the dough hook and mix on medium-low speed, occasionally scraping down the bowl for 2 or 3 minutes until the pre-doughs become more cohesive and assimilated into each other. Add more flour or water as needed until the dough is soft and slightly sticky (that’s where I started to add the first of the extra 94 g)
  4. Dust a work surface with flour, take the dough out of the mixer and roll it into the flour to coat and knead for 3 to 4 minutes by hand, incorporating only as much flour as needed (yeah! right) until the dough feels soft and tacky but not sticky
  5. Form into a ball and let rest for 5 minutes
  6. Lightly oil a bowl or dough bucket
  7. Resume kneading for 1 minute and make the final flour adjustment. The dough should pass the windowpane test. (Well, mine didn’t! Not by a long shot. It ripped like crazy, so forget about hand mixing, I threw it back into the mixer and went at it, on medium-low, for as many minutes as it needed to pass the windowpane test and it took a while and I did have to add flour – although it set my teeth on edge because that’s exactly what I hate do do and I hadn’t added any water so why was the dough SOOOOOOO wet?, but I went on mixing and I went on adding flour until I had added in a total of 94 g and that must have been the magic number because all of a sudden the dough started behaving and passed the windowpane test with flying colors and I was in baking heaven)
  8. Form into a ball and place in the prepared bowl, rolling to coat with oil
  9. Cover loosely with plastic wrap and let rise at room temperature for approximately 45 to 60 minutes, until it is about 1 1/2 its original size
  10. Transfer to a lightly floured surface and loosely form into a batard
  11. Let rest for 15 minutes and form into a tighter batard
  12. Place on a sheet pan lined with parchment paper and dusted with flour (I used a mixture of bran and semolina as it works fine for me)
  13. Cover loosely with plastic wrap and let rise at room temperature for approximately 45 to 60 minutes, until it has grown to 1 1/2 time its original size
  14. Preheat the oven to 425 F/218 C after putting in it a baking stone and an empty metal pan
  15. When dough is ready to bake, score it (for whole grains it is best to score at a 90-degree angle to the sides of the loaf), pour a cup of water into the metal pan, lower the temperature of the oven to 350 F/177 C (I have an issue with that as I think it’s way too low. I actually would have liked the loaf to come out of the oven a little bit browner and ruddier, so next time, I’ll shoot for 380 F/193 C from the get go)
  16. Rotate the loaf 180 degrees and continue baking for another 20 to 30 minutes until the loaf is rich brown on all sides, sounds hollow when tapped on the bottom and registers at least 200 F/93 C in the center (as it wasn’t brown enough, I increased the oven temperature to 380 F/193 C and added 10 minutes to the baking time)
  17. Transfer to a cooling rack and allow to cool for at least 2 hours before serving and longer if possible.

Reinhart says that mash breads tend to taste better after they have fully cooled, and up to one or two days after they come out of the oven (store them in aluminum foil or a paper bag).

So I left the mash bread to cool all evening and all night and I sliced it open for breakfast this morning. Here is what the bread should look like according to Reinhart (I scanned the image from the book) …

…and here is what mine looks like:

So maybe mine is a little less airy (doesn’t it sound better than “denser”?) but it isn’t too far off the mark. It is not however what I was hoping to achieve, which is this:

… and I got that using the Baggett’s recipe in Kneadlessly Simple for a 100% whole wheat honey bread based on Reinhart’s mash method. I will need to put the two recipes side by side and see where they differ and try to make adjustments to Reinhart’s until I get the same result. Why not just stick to Baggett’s recipe? Because I don’t find it particularly advantageous not to have to knead. In fact Baggett has us do some heavy mixing (with a spoon) which I find pretty tiresome. Plus her method is for home use only. It wouldn’t work in an environment where you have to make more than one loaf at a time.
Tastewise, Reinhart’s mash bread is very good. It’s hard to describe the flavor other than by saying that it is, well, wheaty, which I happen to love. It doesn’t feel dense or heavy under the tooth, it isn’t chewy, it’s just a great sandwich or breakfast bread. It could not pass for a baguette or a ciabatta but it certainly stands its ground. Will I make it again? Yes, but with white whole wheat to see the difference. Stay tuned!
I had sent a link to this post to Peter Reinhart and here is what he kindly wrote back:
“Thanks for a very entertaining ride! I love that you are playing with all these ideas in your own quest for bread you can fall in love with. Bravo! Nancy’s loaf really gave you great holes–I haven’t been able to get those with my method. 
I tried developing a mash using boiling water and never thought to use the microwave the way Nancy did–see, we all have things to learn. I gave up on it because it was too hard to maintain at the right temp. 
My wetter version, which really can work without all the oven fretting–just put it in a warm oven and turn it off–the next day the mash should taste sweet like maltomeal cereal. But then, yes, you do have to add lots of flour because it’s such a wet mash. 
I think there’s room for perfecting this concept to create the kind of bread you’re looking for but, now that I’m about to put the latest book to bed after a year of intensive writing and research (it goes to press Friday, God willing), I’ll be taking a break from breads for a while and just recharge this summer. 
But you know, sooner or later, I’ll dive back in and go after it again.
Interestingly, the whole wheat bread that seems to get the best crumb for me is the spent grain bread with biga. It always opens up nicely and the spent grain adds fabulous flavor. I get the grain from my local brew pub where the brewmaster is happy to set aside a bag from whatever he’s making and I subdivide it into smaller zip bags and keep it frozen. The spent grain has a lot of positive effects on the dough. If you try it, let me know.”
Thank you, Peter! I’ll be sure to read these 75 pages before the new book comes out!

This loaf has been submitted to Susan, from Wild Yeast, for her weekly Yeastpotting feature.

Share this:

  • Facebook
  • Pinterest
  • Twitter
  • Email
  • Print

May 26, 2009 · Filed Under: Breads, Breads made with starter, Recipes, Yeasted breads · 10 Comments

Further musings on nutrition and the (very) young

The scene takes place in the car driving by a well-known fast food restaurant. The characters are Sophia, my 4-year old granddaughter, and myself.
Sophia: I loooooooove chicken nuggets!
Me: Chicken nuggets may be very tasty but they are not very good for your body, you know and…
Sophia: Yes, they are! Maybe they are not very good for your body but my body loves them!

Share this:

  • Facebook
  • Pinterest
  • Twitter
  • Email
  • Print

May 25, 2009 · Filed Under: Misc. writing · Leave a Comment

Pondering Preferments

A chickpea levain I once made for a Cretan spiced bread

I am a huge whole grains fan, so even though I loved the Whole Grains Workshop I attended last April at the San Francisco Baking Institute, I was dismayed to learn, pretty much on the first day, that since specialty flours (i.e. any flour which is not wheat) are weak by nature and since fermentation weakens them further, it is actually better to use them in preferments than in the final dough.
The baker is thus able to vary the flavor profiles while still using more regular bread flour in the final dough (thus bringing some of the strength back to it). It certainly works very well taste-wise. While at SFBI, I sampled many breads made with specialty flour preferments – as then student Safa Hemzé was experimenting with various flours – and the range of flavors was enormous. For an article on Safa’s work, click here.
The pictures below were taken by me at SFBI in January during an informal bread tasting session. The breads were all made by Safa.


I asked Safa about the meaning of this 20% figure and here is what he kindly wrote back: “The 20% refers to the amount of starter I used in each formulation. For example, 100% flour, 65% water, 2,2 % salt, 20% starter, .2% yeast (optional if retarding overnight or long final proofing). You can also add some additional “ancient flour” if you wish. Note that the total amount of non-gluten flour should remain under 15% in your total formulation”.
Although I loved the flavors these various preferments brought to each bread, I don’t think that the nutritional benefits of putting most of the specialty flour in the preferment are quite the same as they would be if more of the ancient grain flour was used in the final dough together with more whole grain flour instead of more regular bread flour.
Of course using a preferment is in itself a healthful choice. As Andrew Whitley writes in Bread Matters, a passionate plea for slow bread, “research has recently revealed that making yeasted breads quickly may not leave time for important changes to take place. For instance, fermenting dough for six hours as opposed to 30 minutes removes around 80 per cent of a potentially carcinogenic substance called acrylamide that is found in bread crusts, and long yeast fermentations conserve the highest levels of B vitamins in dough (48 per cent of vitamin B1 is lost in rapidly made white bread”.
Using a sourdough starter may even be better than just using a poolish or a sponge. Whitley goes on to write in another chapter, “lactic acid bacteria play a part in neutralising substances in wheat flour that can limit nutrient availability to human consumers”. 
He explains that “the bran contains considerable amount of phytic acid, which inhibits the absorption of these valuable minerals and trace elements” and that, according to a recent French study, “the action of lactic acid bacteria in sourdough fermentations improves the nutritional quality of wheat bread by reducing the amount of phytate” whereas “simple fermentation with yeast produced less than half the quantity of soluble (available) magnesium at the end of a four-hour period compared with the sourdough”.
So far so good! We have the great taste and some nutritional benefits (the nutrients present in the specialty and/or whole flour plus the outcome of the chemical activity at work in the prefermentation), but can we do better?
After all, as Beatrice Ojakangas puts it in Great Whole Grain Breads, a well-documented book first published in 1984 which is full of interesting and out-of-the-ordinary recipes, “bulk for bulk, whole grain breads have about half the calories of traditional breads, supply the most preferable plant protein, and offer valuable fiber to the diet”. 
Couldn’t we have our whole grain and specialty flour flavors and eat them too?
I don’t know but I mean to try and find some answers.
You know how some passionate cooks or bakers set themselves challenges, like making of all the recipes in Mastering the Art of French Cooking or baking all of the bread formulas in the Bread Maker’s Apprentice? Well, since I’d like to find out whether or not other techniques would make it possible to use more whole grains in more delicious breads, the (limited, I’ll admit it) challenge I am setting to myself is to try and master the master formula detailed by Peter Reinhart in Whole Grain Breads.
Why this particular one?

  • Because my first brush with that technique was with a derivative method developed by Nancy Baggett in Kneadlessly Simple (a book I reviewed here). I used it to make a 100% whole wheat loaf and I never made or ate a better 100% whole wheat bread (for some info on my experience making that bread, click here and go to bottom of post); Baggett acknowledges her debt to Reinhart, so I’d like to see what Reinhart’s original idea was;
  • Because we liked what I have already baked from the Reinhart’s book, such as the 100 % whole grain multigrain baguettes and I wouldn’t mind getting a firm foundation as to the technique before trying my hand at some of his other recipes (although one of his mashes and his whole wheat levain are sitting on the kitchen counter right now, waiting to be made into one of his mash breads) but I am pretty much proceeding by trial-and-error with that bread since it is a mixture of his ideas and my own and I’d like to be more methodical;
  • Because although I adore crunchy, chewy, holey-crumby baguettes and many other mostly white breads, I also love dense loaves (so does my son-in-law, so that makes two of us), a taste that isn’t not always shared by my under-20 descendants. I wouldn’t mind seducing their palate with other flours in such a way that they wouldn’t even realize they were eating “healthfully”, a word which, for whatever reason, seems less than compelling to their young ears… And I’ll be the first to admit that it is absolutely useless to put more “good-for-you” flours in the bread if it doesn’t get eaten;
  • Because my eyes have a tendency to glaze over when I try to read the 75 pages or so that lead up to the master formula in Reinhard’s book and because I have yet to follow any recipe faithfully. I’ll have to if I want to master the technique. So I will both read the introduction as carefully as Reinhart begs us to (and I will try not to do that at night when nap attacks are more likely) and follow his instructions to the letter. That’s the promise and the challenge.

As I am currently on an assignment (nothing to do with bread, alas), I can’t promise it will be immediate and even hesitate to set a timeframe. But I promise that it will happen and that I will keep you posted. Meanwhile I’ll keep on baking in my spare time ! Please share your thoughts with me as to the quandary between better taste and better nutrition. 

Share this:

  • Facebook
  • Pinterest
  • Twitter
  • Email
  • Print

May 25, 2009 · Filed Under: BreadCrumbs · 6 Comments

  • « Previous Page
  • 1
  • …
  • 73
  • 74
  • 75
  • 76
  • 77
  • …
  • 81
  • Next Page »

Hello!

MC-Profile- 2013 - DSC_0934

My name is MC: formerly a translator,  now a serious home baker and a blogger. If you like real bread and love to meet other bakers, you are in the right place. Come on in...

Learn more →

  • Email
  • Facebook
  • Instagram
  • Pinterest
  • RSS
  • Twitter

Don’t want to miss a post?

Subscribe to Farine via email

Archives

Categories

Copyright © 2025 Farine · Design by Design Chicky Log in