Farine

Crazy for Bread

  • Home
  • About
    • FAQ
  • Recipes
  • Resources
    • BreadCrumbs
    • Other Bread Sites
    • The Grain Gathering
  • Artisans

Search Results for: how to make bread

One dough: three breads

Having bought a huge bag of red onions at Costco to make Kathy’s Asiago-Onion Bread, I had to use up these pungent bulbs, right? No sense in letting them go to waste. So after French onion soup, onion omelet, and so forth, I decided to go all out for onion bread.
For the dough I turned to Nancy Silverton’s Italian Ring Bread in her book, Breads from La Brea Bakery as I had already used that recipe for fougasse last summer and I remembered loving it. Try it! You’ll see. It is soft, smooth and flexible and incredibly forgiving. So much so that even though I had dimpled the foccacia all over and it was weighed down by onions and goat chesse, half of it sprang back up in the oven like the throbbing throat of a demented frog…
And best of all, this dough is so versatile, the same batch can yield very different breads:

Onion Twist


Goat-cheese Onion Foccacia
Poppy-seed Wreath
Please note that this is a two-day dough and that there is no onion in the wreath.
Ingredients:
For the sponge
254 g cool water (70F/21C)
57 g mature white starter
227 g unbleached all-purpose flour
For the final dough
556 g cold water (55F/13C)
5 g instant dry yeast
the whole sponge
1136 g unbleached all-purpose flour
25 g salt
54 g extra-virgin olive oil
Other
3 big onions, peeled, sliced and cooked in two spoonfuls of olive oil until caramelized
40 g important parmesan cheese, freshly grated
60 g fresh goat cheese (if desired, for the foccacia)
Poppy seeds for the wreath (optional)
extra-virgin olive oil (for brushing)
Freshly ground black pepper (optional)
Method:

  1. The day before baking, make a sponge by placing water, white starter and flour in a mixing bowl and stirring with a spatula
  2. Cover the bowl tightly with plastic wrap and let the dough ferment overnight at room temperature
  3. The day of the baking, place water and yeast in the bowl of a mixer. Uncover the sponge and add it to the yeast mixture, along with the flour
  4. Mix the dough on low speed for 4 minutes
  5. Cover the dough with a proofing cloth and allow it to rest in the bowl about 20 minutes (autolyse)
  6. Add the salt and continue mixing on medium speed for 4 minutes, scraping the dough down the sides of the bowl as necessary with a rubber spatula
  7. Add the olive oil and mix on medium speed until incorporated and desired dough temperature (74-78 F/23-26C) is reached
  8. Remove the dough from the mixing bowl. It should feel soft and resilient. Mix it for a few minutes by hand on a lightly floured work surface
  9. Place in oiled bowl, cover tightly with plastic wrap and let ferment at room temperature until doubled in volume, about 3 hours (mine fermented for one hour at room temperature last night then it went into the fridge overnight)
  10. Preheat the oven to 450F/232C one hour before baking
  11. Uncover the dough and turn it onto a lightly floured surface
  12. Stretch it lightly into a rectangle, dust it with flour and divide it into four equal pieces (each of mine weighed around 570 g)
  13. Pre-shape as 4 balls and let rest, covered, for about 20 minutes
  14. Shape as 4 balls and let proof for 40 minutes, covered
  15. To make the twists, flatten two of the balls into rectangles with a rolling pin, snip 2 inch-strips on the long sides of the rectangles, spread the cooled onions in the middle, dust with parmesan cheese (if desired, use some freshly ground black pepper as well)
  16. Fold the strips onto the middle, forming a braided pattern
  17. Brush with olive oil and bake for 35 minutes (with steam the first ten minutes). Check at half-time to make sure the loaves are not browning too quickly. If you feel that’s the case, tent some foil over them
  18. While the onion twists are baking, uncover one of the two remaining balls, flatten it lightly and using your elbow as a cutter, make a hole in the middle. Widen the hole with your fingers and gently set the crown to rest, covered, on a semolina-dusted piece of parchment paper
  19. Take the last ball, flatten it gently with your hands, dimple it all around, brush with olive oil, dimple again and spread with caramelized onions and crumbled goat cheese (add freshly ground pepper if desired)
  20. Set the foccacia to continue proofing, covered, next to the crown until the twists come out of the oven
  21. When the oven is ready, lightly spray the wreath with water, then dust it with poppy seeds and snip with scissors all around to form the design
  22. Bake the wreath and the focaccia at 450F/232C for 35 minutes, with steam the first 10 minutes. Check after 15 minutes to make sure neither of them is browning too fast (you may want to tent some foil over the focaccia at one point to prevent the onions from becoming too dark. I didn’t do it and I should have)
  23. Rotate if necessary to ensure even baking
  24. Let cool on a wire rack before eating

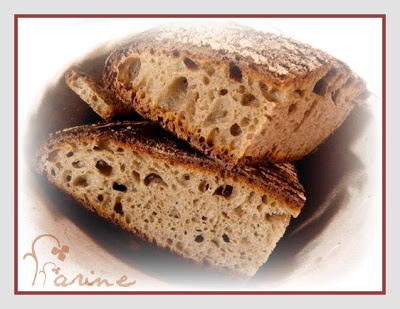
I can’t slice the wreath open as I am giving it to a friend, so I won’t know what its crumb is like but isn’t the difference between the crumb of the twist and that of the foccacia rather striking? Same dough, different handling and shaping and very very different results.


Twist crumb


Foccacia crumb

But then, it’s a good thing, isn’t? If not, the onion/parmesan filling would have ended up in our lap!

All these breads go to Susan, from Wild Yeast, for Yeastpotting.

Share this:

  • Click to share on Facebook (Opens in new window) Facebook
  • Click to share on Pinterest (Opens in new window) Pinterest
  • Click to share on X (Opens in new window) X
  • Click to email a link to a friend (Opens in new window) Email
  • Click to print (Opens in new window) Print

November 5, 2009 · Filed Under: Breads, Breads made with starter, Recipes · 6 Comments

Vermont Apple Bread

Lucky baker that I am, I just spent three most instructive days baking with Jeff Hamelman at the King Arthur Flour Baking Education Center in Central Vermont (more about this experience in another post) and the rest of the week visiting a French baker who makes extraordinary bread in Northern Vermont (more about him and his bakery in yet another post).
When I came home, one of the first thing I did (after dividing my carload of bread between family and friends) was to feed the starter (which had been waiting in the fridge) and set it to warm up in the proofbox. I fed it again twice the next day and on the morning after, it was bubbling away and ready to work.
I wanted to showcase the deliciously tangy raw apple cider I had brought back from Green Wind Farm (which also makes the creamiest whole-milk yogurt and a very flavorful maple syrup) and drawing inspiration from Jeff’s Normandy Apple Bread in Bread: A Baker’s Book of Techniques and Recipes, I made this very simple bread. If you don’t have diced dried apples (I had bought mine at the King Arthur store), you can slow-roast the apple slices in the oven at 250 F/120C as Jeff does: it would probably boost the flavor of the cider even more.
For a slightly sweeter bread, a splash of boiled cider could be added.

Desired dough temperature: 76F/24C
Ingredients (for two loaves):

333 g white whole wheat flour
333 g unbleached all-purpose flour
100 g water (I needed almost 100g on top of that)
227 g fresh apple cider
22 g salt
267 g mature liquid starter (100% hydration)
100 g diced dried apples (quick-soaked in hot water and immediately drained – I used that water in the dough as part of the total water), cooled

Method:

  1. Mix flour, cider and half of the water with the levain in the bowl of the mixer until incorporated (add water as needed to hydrate the flour)
  2. Let rest for 20 minutes (autolyse)
  3. Add the salt and mix until dough consistency is medium-soft (adding water as needed) and the gluten starts to develop
  4. Add the diced dried apples
  5. Mix until incorporated
  6. Transfer to an oil-sprayed dough bucket, cover and set to ferment in a warm place
  7. After one hour, give the dough a fold
  8. Ferment one more hour and transfer to a lightly floured work surface
  9. Divide in two equal parts (about 750 g each) and shape each part into a rough cylinder
  10. Let rest. covered, for 20 minutes
  11. Pre-heat the oven to 480 degrees F/250 C, after placing a baking stone on the middle shelf with an empty metal recipient on the shelf immediately under
  12. Shape each piece of dough as a batard and set to proof in a floured basket for about one hour in a warmish place (the dough is ready when a finger poke leaves an indentation that takes 1 or 2 seconds to spring back).
  13. Invert the two baskets onto a semolina-dusted parchment paper set on a baking sheet and gently brush excess flour off the loaves
  14. Score each loaf straight down the middle with a baker’s lame or a serrated knife
  15. Pour one cup of water in the metal recipient placed under the baking stone and set the two loaves (still on the parchment paper) on the stone
  16. Thoroughly mist the oven with water
  17. Close the oven door and lower the temperature to 450 F/232 C
  18. Bake for 35 minutes
  19. After 35 minutes, check the color of the loaves. If already well browned, tent a piece of foil over them to prevent burning and keep baking for another 5 to 10 minutes
  20. Turn off the oven and let the loaves rest in it with the door ajar for another 10 minutes
  21. Set to cool on a wire rack.

This Vermont Apple Bread goes to Susan, fromWild Yeast, for Yeastpotting.

Share this:

  • Click to share on Facebook (Opens in new window) Facebook
  • Click to share on Pinterest (Opens in new window) Pinterest
  • Click to share on X (Opens in new window) X
  • Click to email a link to a friend (Opens in new window) Email
  • Click to print (Opens in new window) Print

October 25, 2009 · Filed Under: Breads, Breads made with starter, Recipes · 14 Comments

Bread Flour : What to Look For

As indicated in the last few posts, Didier Rosada talked at length about bread flour during last month’s Artisan III workshop at SFBI, detailing the testing process by which the miller determines the ash content, the protein content and the enzymatic activity. At the end of his lecture on flour, he offered a brief recap of what to look for in a bread flour for the purpose of artisan baking.

If you want to make artisan bread, you want your bread flour to be:

  • Made of 100% hard (red or white) winter wheat (or at the very least of 80% hard winter wheat + 20% hard spring wheat) for the dough to be able to withstand longer fermentation times
  • Unbleached for sure
  • Enriched (for better nutritional value)
  • Unbromated (watch out as the addition of calcium bromate to flour is still allowed in some States as well as in some countries while it is forbidden in the European Union)
  • Organic if possible (although organic flours are still relatively new and may be a bit more inconsistent)
  • With a protein content of 10.5 to 12%
  • With an ash content of .48 to .56
  • With a falling number 0f 250 to 300

These are only guidelines and a baking test will be needed for each new flour. According to Rosada, it is best for the baker to work with big mills as small mills seldom have a lab and may also lack access to different crops. If a local crop is bad, then flour quality will be poor because the miller has already contracted with the farmer to buy the crop, whereas a bigger mill can mix different qualities of wheat to produce a flour with the required specs. However working with big mills may come in conflict with the wish to eat local. Pros and cons will need to be weighed.
Stone-ground isn’t necessarily better. Very old-style mills with hand-sharpened millstones may yield flours with poor baking properties. Romantic notions notwithstanding, if your flour comes from an ancient mill still equipped with millstones which the miller sharpens himself (such mills are becoming rarer and rarer but still exist. If you’d like to visit one and can read/understand French, please click here), you may be able to make a terrific “miche” but it will very difficult for you to produce a perfect baguette.
In other words, make sure you know your flour
Of course, for the home baker it is easier said than done, at least in the US where the consumer has often no access to the flour’s specification sheet (which gives a general idea of its specs) or to its certificate of analysis (which gives exact values). The home baker therefore usually has to go by the label and that label isn’t very specific as evidenced below:

The only certainty I had after perusing the above label for Whole Foods 365 organic all-purpose flour (my favorite) was that enzymes had been added (the miller had put in malted barley flour). I had to write to the company to find out that :

  • this flour comes from hard red winter wheat
  • its protein content is a minimum of 10% and a maximum of 12%
  • its moisture content is a minimum of 12% and a maximum of 14.5%
  • its ash content is a minimum of 0.45% and a maximum of 0.65%
  • its falling number is a minimum of 220 and a maximum of 280.

I was first told by the “customer information specialist” who provided these details that the information was proprietary but when I wrote back to insist, she relented and allowed me to share it on the blog.
She also asked me to make it known that the information provided was based on current product specifications and could change without notice, suggesting that Whole Foods “guests” always refer to the product labels for the most recent information.
As for King Arthur Flours (whose labels are not more informative),

their spec sheets can be found on King Arthur’s website: here for conventional flours and here for organic ones.
You will notice however that these spec sheets concern professional flours and not the flours commonly found in supermarkets across the US. When I wrote to enquire about specifications for the flours available to home bakers, a kindly customer service representative informed me that Sir Galahad was the professional name for King Arthur conventional all-purpose flour and Special the professional name for its conventional bread flour. So now we know. 🙂
However before the intervention of said kindly customer service rep, I had received a rather less amiable reply from another rep to an inquiry regarding protein content. Here is the text of my initial message: “Hi, I am trying to find out about the protein content (quantity and quality) of various flours, including your AP and bread flours. It is indicated on your website that your AP flour contains 11,7% of protein. However when I calculate the percentage based on 4g of protein in 30g of flour, I get a different number. Please explain why. Also please indicate if your AP is made of a blend of spring and winter wheat” (I had divided 4 g by 30 g and gotten 13.3%).
And here is the reply I received: “Our All-Purpose flour is milled from hard wheat flour, but not necessarily a blend of winter and spring wheat. It is almost impossible to calculate the percentage of protein from the flour bag, because they round things off so much. The all purpose flour that you received is 11.7% gluten however the nutrition label states the protein as 4 grams not percent. Comparing grams to percents is like comparing apples to oranges, two different units of measurements for the same thing. A percentage is a part divided by a whole. The part of the flour’s weight that’s protein (4 grams) is divided by the whole weight of the serving (usually 28 to 30 grams). The result is the percentage of protein in the flour. 4 divided by 30 = 13.3, yet we are saying 11.7. This discrepancy is the way everything can be rounded off. Eg. 4 grams of protein can be anything from 3.5-4.4. The 11.7 could be rounded to 12. I hope this helped to clarify”.
Indeed… In any case, in the end I had the info I wanted and now so do you.
However, adding to the confusion is the fact that the same flour is sometimes marketed under different names across the US. I thus learned during one of the workshops I attended at SFBI over the course of the year that the same organic flour I buy at Whole Foods can be found under another name at Costco (at least in Northern California as the Costco warehouses I have access to here in the Northeast do not carry it) as well as in some supermarkets under yet another label. Oh well! I guess there is no way out of doing a baking test…

Share this:

  • Click to share on Facebook (Opens in new window) Facebook
  • Click to share on Pinterest (Opens in new window) Pinterest
  • Click to share on X (Opens in new window) X
  • Click to email a link to a friend (Opens in new window) Email
  • Click to print (Opens in new window) Print

September 21, 2009 · Filed Under: BreadCrumbs · 18 Comments

Rising to the Challenge: Bread Sculpture 2009

For Slow Food’s big weekend in San Francisco last year, the bakers at the San Francisco Baking Institute created the gigantic bread snail you can see here. This year they outdid themselves by recreating out of bread for the SF Chefs event not only the Golden Gate Bridge but the vineyards of Napa and Sonoma counties, the waters of the Pacific Ocean and the crabs for which San Francisco’s seafood restaurants are justly famous!
According to the SFBI team that designed and created the sculpture this year…

from left to right, Justine Maiorino, Juliette Leichuk, Michel Suas, Valerie Rogers,
Sydnee Kennedy, Safa Hamzé, Rocio Villanueva, Greg Mindel,
Laura Cronin, Frank Sally, Miyuki Togi

…1,053 pounds of live fermented bread dough went into its making. Three mega miches were baked that were so heavy (660 pounds total)…

…that a forklift was required to load and unload them. Two hundred bagels (38 pounds of dough) and 158 breadsticks (60 pounds) were used to make the bridge suspension cables.


Amber waves of baguettes recreated the swell of the Pacific…

…while 46 golden crabs (66 pounds) (sorry! no picture of them!), 8 sheathes of wheat (106 pounds) and a grape vine (18 pounds) hung with plump clusters of grapes suggested the vibrant food and wine culture of the Bay Area.

The flowers, leaves and grapes as well as the bridge panels and the fence were made of decorative dough (162 pounds) colored with paprika, beet powder, spinach powder and turmeric.

In addition, thirty miches (105 pounds) were baked to decorate the sculpture and illustrate the rich bread tradition of the San Francisco area.

“The hardest part was calculating the structure of the largest possible loaf that could hold its own weight when standing on its edge, without it getting stuck in the oven during the bake”, says the team.


The sculpture – which took 1 1/2 week to bake and build, planning and test bakes not included – was created at SFBI, then disassembled, loaded onto a flat bed truck…

…driven to Union Square, and reassembled on site.


SFBI President, Michel Suas, with San Francisco Mayor Gavin Newsom

Share this:

  • Click to share on Facebook (Opens in new window) Facebook
  • Click to share on Pinterest (Opens in new window) Pinterest
  • Click to share on X (Opens in new window) X
  • Click to email a link to a friend (Opens in new window) Email
  • Click to print (Opens in new window) Print

September 5, 2009 · Filed Under: BreadCrumbs · 6 Comments

Carrot bread

carrot bread

I don’t know what’s wrong with me but, just like Eve in the Garden of Eden, I can’t help it. Ever since my first fermented apple, I have had my head wrapped around the idea of fermenting (that is when I wasn’t dreaming up our next ciabatta) and so, just like Eve, I finally I gave in.
I bought a bag of California seedless raisins and went with it. I chopped them some, then put them in water. Stirred daily, they macerated for two weeks, bubbling away. I tasted the soaking water periodically but forgot to do it after a while and then I tasted again and, lo and behold, all sugar was gone all of a sudden and I was sipping pure alcohol !
I wasn’t sure what would happen next to the mixture if fermentation went on, so I decided to put a stop to it and use the stuff to make bread. To compensate for this reckless use of an inebriating substance, I also decided to go virtuous and incorporate freshly grated carrots as an ingredient.
I added some non fermented raisins to give the yeast some sugar to snack on blindly in case it became completely wasted and couldn’t fight its way out of the gluten chains. I put in a bit of sugar for the same reason.
The sweetener could be skipped but, truly, these buns do not really taste sweet, so unless it is for dietary reasons, it should probably stay in. And I wouldn’t use a liquid sweetener such as honey or agave syrup because this is one wet dough already!
Now I have to tell you, folks! These buns were a hit. They are too boozy for the mouths of babes though and if you eat more than one and hit the road, you may unwittingly be DUI and not pass the breathalyzer test. So watch out and pace yourself. I know it’s hard, but they keep and reheat very well, and they can be frozen. It’s not as if you had to go through the whole batch in one fell swoop and, anyway, I was just kidding (I think)…

Ingredients (for 12 buns and a big loaf or for 24 buns or 2 big loaves):
For the fermented raisins (to be made 2 weeks ahead)
150 g seedless raisins, chopped
300 g water
For the levain
340 g mature 100% white starter
340 g water
340 g unbleached all-purpose flour
For the final dough
802 g unbleached all-purpose flour
203 g white whole wheat flour
577 g water
540 g levain
440 g carrots, raw, shredded
230 g raisin water
175 g raisins, whole (not fermented)
90 g drained fermented raisins
50 g light brown sugar (optional)
40 g milk
27 g extra-virgin olive oil
24 g salt
6 g instant yeast
1 g diastatic malt powder

Method:

    1. The afternoon before mixing the dough, mix together all the ingredients for the levain and let the mixture rest at room temperature
    2. The morning after, mix the flour, the yeast, the levain and 500 g of the water on low speed in the bowl of the mixer until just incorporated
    3. Let rest, covered, for 20 to 30 minutes (autolyse)
    4. Add the salt and mix on low speed until the salt is incorporated and, when pulling gently on a piece of dough with wet hands, you can see that the gluten structure has barely started to develop (the mixing time should be kept rather short, especially if using a KitchenAid type mixer. I use a spiral mixer which is very gentle and only has one speed and, after the autolyse, I only need to mix the dough for 3 to 4 minutes)
    5. Add the carrots and the raisins
    6. Mix the remaining liquid with the olive oil and the milk and slowly, very slowly, dribble it over the dough at it spins (a process known as “double hydration”)
    7. When all the liquid is incorporated, stop the machine and transfer the dough (it will be almost runny) to an oiled container (oblong shape is best as it makes it possible to fold the dough straight in the container. As indicated in a previous post, I use an Ikea sturdy food container which a snap-on lid)
    1. Let it ferment for 2 to 3 hours, with folds every 30 minutes ( the dough was so weak that I gave it 7 folds all together, including one last fold after it had spent 30 minutes in the fridge. It was either that or get ready to drink the bread with a straw later, it was so wet)

The dough looked like batter
  1. Then refrigerate for two to three hours
  2. Turn the dough out onto a heavily floured work surface and dust it with flour before slicing it in two (lengthwise). Then according to what you want, divide each piece in 12 or not (for want of a sufficient number of half sheet pans to make 24 rolls, I went for 12 rolls and 1 loaf)

  3. Gently transfer the pieces to parchment paper dusted with semolina flour and flour
  4. Dust them with flour again and dimple them with your fingers
  5. Then let rise another hour at room temperature in a large clear plastic bag filled with air
  6. Pre-heat the oven to 500 F/260 C at least 45 minutes before baking
  7. When ready to bake, heavily mist the interior of the oven with water and slide in the loaves (as my oven is tiny, I can only bake one half-sheet pan load at a time). Spray twice more at 2 minute- intervals, then bake for 15 minutes (at home, in my “normal” oven, I then lower the temperature to 450 F/232 C). Rotate the bunnies and bake another 8 minutes
  8. Set loaves on a rack to cool and bake the other one(s) the same way.
Besides the boozy kick, these buns are flaky, a little bit like croissants on steroids.

Share this:

  • Click to share on Facebook (Opens in new window) Facebook
  • Click to share on Pinterest (Opens in new window) Pinterest
  • Click to share on X (Opens in new window) X
  • Click to email a link to a friend (Opens in new window) Email
  • Click to print (Opens in new window) Print

August 17, 2009 · Filed Under: Breads, Breads made with starter, Recipes · 6 Comments

  • « Previous Page
  • 1
  • …
  • 12
  • 13
  • 14
  • 15
  • 16
  • …
  • 55
  • Next Page »

Hello!

MC-Profile- 2013 - DSC_0934

My name is MC: formerly a translator,  now a serious home baker and a blogger. If you like real bread and love to meet other bakers, you are in the right place. Come on in...

Learn more →

  • Email
  • Facebook
  • Instagram
  • Pinterest
  • RSS
  • Twitter

Don’t want to miss a post?

Subscribe to Farine via email

Archives

Categories

Copyright © 2025 Farine · Design by Design Chicky Log in